Monday 30 March 2015

MASTER YOUR CONTOURING


Here goes my attempt at a contouring tutorial!This is just my way, I'm not an expert myself. I can however spot a bad contour, some people look like they've been abroad and sunbathed with their glasses on for too long.
--------------------------------------
What is contour?
so contour literally means to 'outline' a shape or a figure. In cosmetic terms it means to create shadows, so your shadowing your face. Shadows help to define certain areas, so any area you want to push back from your eye you need to contour.
What do you use? 
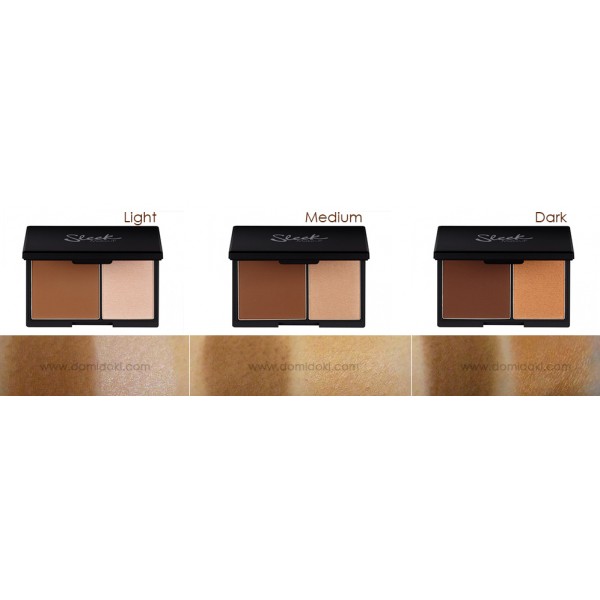
I use sleek's contour kit which retails at £6.49  grab yours here
You also need a couple of brushes to apply the dark colour correctly.


What is highlight?

highlighting is the opposite of shadowing, it means adding light to your face. Opposite again to contouring your pulling things towards your eye.Making it appear brighter.

What do you use?

MAC's highlighter in light boost grab yours here. This is abit pricey at £18.50 but there are cheaper ones, for example in the Sleek contour kit there is two colours and the lighter colour from that would do perfectly fine it's just personal preference. Sleek also do a highlighter just like this for more than half the price i have linked it here. This product comes in 3 different shades, Bright Forecast, Radiant rose and Light boost.


So i start by applying the darker colour, i pout to create the natural cheek bone lines and apply with a slanted brush. http://www.boots.com/en/Real-Techniques-Limited-Edition-Duo-Fibre-Set_1333699/. I also put it along my forehead, down the sides of  nose and along the jaw line.


next is the white (pale colour) I apply this to the middle of my nose, below the dark line on my cheek bone, in triangular sections from the eye down onto my cheeks, a small amount on my cupids bow and a splash on my chin.That was a long sentence! The MAC highlighter is like a pen so application is super easy. If your using a white powder or similar product to do this step then  a blusher brush is fine to use or a fine fiber brush ( even an eyeshadow brush will do the trick)heres a cheap one.
Below are some photos of where you should be so far.


So by now your looking kinda creepy, its not the best look, You would 'nt want your crush to come to the door whilst you were contouring put it that way! My cousin will kill me when she sees this photo, but at least you have an idea what i mean.( love you Harriet!) :')

next step is to blend all this in and then apply your foundation. The other day i picked up some makeup sponges from the hairdressing warehouse so i have been using them to blend in. Any makeup sponges will do,  lots of people like the beauty blenders, but I can't bring myself to spend  £15 on a sponge.. heres one for you to see Im sure it's great but i just cant. You can buy them on E bay and they are just as good, there is a link here to one for £2.29! HERE. Take your sponge and wet it under the tap, it should double in size, squeeze out the excess water.  Next, apply some foundation to the back of your hand and dab your blender into the foundation, I'm using my normal MAC foundation. You don't want too much as you just want to blend in the colours and you already have a lot of makeup on your face. 


It's very important to set your face at this point,with powder. Use a powder brush I like Real Techniques powder brush. Any will do, this step is very important as you don't want the colours to run into each other.


It should all be coming together now and your face should be looking radiant and slim! 

I'd love to know how you lot all contour, as I said before this is just one way I'm not saying It's the right way It's just the way i like to do It. Thanks for reading, let me know how you get on! 


Happy Contouring!


Sunday 29 March 2015

SKINCARE

Great looking skin


when was the last time you loved your skin?

Your skin is the largest organ in your body, therefore you must look after it, especially in places that it is on show. Yep, thats right I'm talking about your face!My mum has told me from a young age to look after my skin, it's the only one you get. 


Deep down we all know we should not be using makeup wipes to take our makeup off. Although they are quick, simple and cheap, they could be the route of your skincare problems. Sales of wipes have doubled in the last year with them being the cheapest, quickest way to remove your makeup. I must admit cleansing and toning is time consuming but is 100% worth it. If you imagine you're applying your £30 foundation, why take it off with a £2.20 pack of makeup wipes. You spend on your application, so why not spend on the removal. Tonight, when you girls take your makeup off with a makeup wipe,cleanse &  tone afterwards and wipe over your face  and neck after you have used your makeup wipes. Especially in hard to reach areas such as the curves of your nose top and bottom, your eyebrows(this is somewhere we often forget when removing makeup) and see how much makeup you would be going to sleep with still left on your face. Shocking hey!


Some of my favourite makeup wipes are listed below.

Simple Makeup wipes

MAC makeup wipes

Garnier Start Afresh

No.7 Quick thinking wipes


DID YOU KNOW?

People are judged more intelligent and attractive if their eyes wrinkle round the corners when they smile

First of all you need to identify you skin type, to buy the products that suit you.


  • If you have normal skin, your skin has the right balance of moisture, oil and durability.

    • If you have oily skin you face might appear shiny, greasy or oily only a few hours after washing.
    • If you have dry skin, it's often quite flaky.
    • If you have sensitive skin, your skin is often tight or itchy and you experience allergic reactions when you come into contact with certain chemicals.
    • A lot of people have combination skin, where part of your face is oily and another part is dry.
    TOP SKIN TIPS
    • Try to avoid touching your face too much during the day, if you're touching your face a lot you are moving dirt from your hands onto your face.
    • Wash your face twice a day.
    • Drink plenty of water.
    • Use weekly facemasks.
    • Balanced diet - eat your  fab fruit and  very nice veggies!:)
    • Use blackhead clearing strips to clean the hard to reach parts of your nose!
    • As tempting as it is, if you mess with a spot it will actually get worse, so leave it!! apply a cold compress twice a day to lessen the irritation. (cool piece of cotton wool or even a cold teabag!)
    • exfoliate weekly, to give a rosy glow.
    • If you skip every other tip, just be sure to moisturise, especially at night. Your skin renews at night so you can help it along the way!
    • Tie your hair back- your hair has natural oils, so by braiding your hair or simply putting it in a bun,you will be keeping those oils off your face.
    • Use eye cream- Yes even if you're only 20! When the morning rolls around your skin will be less puffy and more hydrated.


    so what should we all be using?

    C,T,M - CLEANSE, TONE, MOISTURISE.


    I like to use a cleanser, a toner and a moisturiser. Don't get me wrong when you've been out on the lash no one has time to cleanse and tone, once in a while makeup wipes are fine, just limit them if you can.

    For me I have two favourites, They are both  high street brands! My first is the  'Simple' brand that i like to use.you can check them out here. and second is L'oreal. you can browse here 


    The brand is mainly for people with sensitive skin and although i don't suffer from sensitive skin, they seem to work for me! 


    Simple Purifiying Cleanser: £3.29 for 200ml from boots
    • Vital Vitamins for your skins health
    • Pro-Vitamin B5 actively restores, softens and smoothes.
    • No Perfume
    • No Colour
    • No Harsh Chemicals so it won't upset your skin
    • Simple skincare do not use animal derived ingredients


    This toner has Active Benefits:
    £2.19 from for 200ml from superdrug


    • Chamomile: gently soothes
    • Witch Hazel: helps tone and tighten pores
    • 100% alcohol free: non drying, leaves skin soft
    • pH balanced: works in harmony with your skin


    my next favourite is:


     ---------------------------------------------------------


    L'OrΓ©al Paris Skin Perfection Cleansing & Perfecting Milk:£2.66 for 200ml from boots.


    this also has many benefits


    •  suitable for sensitive skin,
    •   for use around the face and eye area. 
    • It is proven to remove make-up and impurities and reveal a better skin texture. 
    • The rich milk, infused with softening actives, removes make-up, even waterproof, from the face and eyes with a soothing texture.


    Loreal's Skin Perfection Velvety Soft Toner: £3.99 for 200ml from boots.
    This toner is great. I've been using this for a while and it really does remove all traces of your cleanser leaving you ready to moisturise.

    • slight perfume, but nothing to harsh.
    • long lasting 
    • leaves skin smooth and feeling nourished.
    • removes impuritites 
    • helps to keep the skin supple.

    hope you enjoyed my skincare post 

    let me know if you have any products you want me to try, email me at: chescavenus@live.co.uk


    next step- Moisturiser!
    your going to laugh at this, I use ALDI's own brand face cream. Yep ALDI !

    I use their  Expert Day & Night creams. At £3.99 each they are a steal. They do exactly what they say on the tin, which is what you want. I've tried many high end creams that I have not been happy with, so it's nice to find one, that's cheap too!

     The day cream :
    • it's SPF 15,
    • 5* star UVA to protect your skin from the sun,
    • Has been proven to moisturise your skin for 24 hours.
    The night cream:
    • has wrinkle reducing properties
    • Shea butter to improve suppleness


    Saturday 28 March 2015

    Lazy Hairstyles


    Unless you're blessed with magic hair, getting your strands to look incredible takes MAJOR time and effort. But, when our alarm clock is the victor in the battle between hitting the snooze button and primping our locks, time and effort are two things we find ourselves lacking 
    some most days.


    So first. dry shampoo is my saviour. The thought of washing my hair makes me want to cry, and I'm a hairdresser πŸ˜‚ I often just bully one of the guys at the salon to wash it for me! Hahaa thanks guys! I love batiste's dark and deep brown dry shampoo. As my hair is dark when I use the normal dry shampoo I look 89 because my hair turns grey! With these silver spots all over .. Not an attractive look. I've linked this below.  For blondes, my friend loves the batiste for light and blondes. She finds that it blends seamlessly with her natural colour. I have also linked this below.

    http://www.boots.com/en/Batiste-Dry-Shampoo-Light-Blonde-200ml_1228545/

    http://www.boots.com/en/Batiste-Dry-Shampoo-Brown-Dark-&-Deep-200ml_1228549/?cm_mmc=pla-_-google-_-PLAs-_-Boots+Shopping+-+Category+-+Toiletries


    MY TOP TIPS:


    1.  sleep in plaits! so easy and so effective, gives you that beachy look without spending hours wanding/curling it. If you don't like the straight ends that this style gives you,curl the bottom of the plait with the straighteners.
    2. Add some salt spray for some texture
    3. Grip with grips upside down- (bumpy side down) They are firmer this way!
    4. Sleep in coconut oil/ conditioner for extra nourished hair the next day- wash it a few times to make sure all of the product is out!
    5. Plait your hair in about 4 small plaits and leave overnight, not from the root because you'll get that 80's crimped look thats not cute.
    6. Ever have hairs that are fly away?- Spraying your brush with hairspray can stop that static electricity and help to keep the frizz at bay.
    7. Number 6 is also good when brushing out curls.
    8. Cover up bobbles with a piece of hair and grip into place.
    9. Two ponytails on top of each other will create a length illusion! making your hair seem longer than it is :)
    10. On the second day, change your parting to the side rather than middle- middle parting is harsh and you can see right down all your roots.
    11. Baby powder will act as a dry shampoo for those 'oops i've ran out' days!
    12. Styling mousse can help lift roots! I love Umberto Gianni's Massive Mousse. Scrunch the moose into damp hair and dry your hair upside down for that extra root boost,you can buy that from here.
    13. Adding a fringe can change your look completely, fringe trims are usually free at a local salon and to have a fringe put in it's only a few pounds.


    MY BEST KEPT SECRET
    I've found the most amazing hairspray in the world & I'm going to share it with you. It's called BIG SEXY HAIR. For hairspray, it's quite pricey. It retails between £8-£12, but you won't be dissapointed. I use this for many of my updo's as it really does hold. Even if i backcomb the top of my hair, it often used to fall flat throughout the day, but with this batboy, I find myself combing it out at the end of the day,
    F A B U L O U S A. 
    you can find it here . Shhh I won't tel if you don't.


    I will now run through a few saviours styles that take minutes to recreate but look like you've spent hours mastering them!

    Bun
    This style is very adaptable, there are so many ways to wear a 'bun' I will talk you through a few of my favourites.

    Doughnut
    Every where I look these day's there is at-least one person with their hair in this style. It's so undone that it looks so done at the same time. I've noticed a lot of air hostesses have their hair in a doughnut. 

    For this look you will need a doughnut, they do these in various colours. Blonde,black,brown are the main colours
    You will need:

    •  a good paddle brush, 
    •  grips,
    •  2 hair bobbles
    •  hairspray. 

    1. Pull your hair into a ponytail and secure with a bobble.
    2. Place your doughnut through your ponytail and make sure all your hair is smooth.
    3. Tip your head upside down and spread your hair over the doughnut evenly.
    4. Take another bobble and place it over the ponytail. 
    5. You should be looking like a peacock at this point with your ends sticking out from around the bobble. Twist them, tuck them under the sides of the doughnut and take two or three grips to secure this into place.
    6. Finish with some hairspray and grip up any loose shorter pieces that may fall from the down.
    7. Pull any pieces down from round the face, for a softer look.
    8. Wear on the side for a different look.
    9. Keep out a piece of hair so that you can plait it around the bobble.


     Twisty bun
    This is again a very simple style that can look very complicated and professional. You will need:

    •  a bobble
    •  few grips 
    1. Pull your hair into a ponytail.
    2. Twist the ponytail.
    3. Twist it round itself, it should help you along the way in where it wants to fall.
    4. Grip into place.
    5. Spritz with a bit of hairspray and off you go!
    Plait
    Another of my favourites for long hair is a plait, one, two,french,dutch or fishtail, they're all gorgeous!

    French

    you will need :

    • bobble
    • grips for fringe pieces
    1. Start by brushing your hair through to get rid of any lugs.
    2. Split you hair into three strands, only using some of your hair.
    3. Plait as normal down the hair adding small pieces of hair in as you go along.
    4. SIDE NOTE: if you have layers, a bit of gel can help you to keep these in the plait!
    5. Bobble the end and squeeze and wiggle the plait a bit to make it look not so 'done'.
    Voila! Good to go 

    Fish tail

    A fish tail plait is similar to a french plait but it only uses two pieces of hair.


    1. Divide your hair into two sections
    2.  Take a piece of hair and Cross it over from one side of the hair to the other.
    3. Keep alternating sides of the hair until you reach the bottom on the plait. You should start to see the plait forming as you go along.
    4. You can always tie it off half way down if you fancy spicing it up a bit!
    5. Tie a bobble round the bottom to secure it. 
    6. Funk it up a bit with some ribbon or a charm.( ideal for children)
    7. Bring the plait over the front of your head for a 'milkmaid' plait.

    Elegant pin up

    you will need
    • grips
    • hairspray
    1. Take sections of hair from the front of your hair bit by bit and grip them on opposite sides.
    2. Smooth the hair as your grip it, hiding the grip under the previous piece of hair.
    3. Spray hair into place.


    Half up 

    Why not throw half of it up for a change. You can plait it, bouffant it, twist it, pin curl it.This style looks great whether your hair is curly or straight.

    you will need:
    • grips
    • hairspray
    • backcombing brush
    1. Back comb the hair so it's better to work with and gives you a bit of height to play with,
    2. Decide whether your going to plait,twist or make a beehive. Personally i like it when you plait the very front two sections of your hair and pin them back. One each side,
    3. This looks best when your hair has some kind of wave in it,
    4. Grip in place,
    5. Spray with hairspray.

    Middle plait:
    This is a super easy style that is very variable.You can dress it up for the weekend and down for the week.

    you will need:
    grips

    1. Section off your hair you wish to plait. I like to section it off with a jaws clip,
    2. Bobble the rest of it that you don't want to use,
    3. Start your plait right at the front of your head taking thin sections and french plaiting your way down, grip just after the crown. 
    4. Use two grips crossed over for a strong hold.
    Hair bow:
    This is the simplest look, but still super cute. You don't even need a bobble!


    1. take two pieces of your hair,
    2. Knot them at the back of your head,
    3. Form a bow,
    4. grip into place,
    5. Spray with hairspray.


    Sleek ponytail:


    This look is super glam, whether your going down the road or on the red carpet. You cant go wrong with a sleek ponytail.

    You will need:
    • A bobble
    • Brush
    • hair oil 
    • shine spray
    1. Comb your hair into a pony-brushing your paddle brush to tame fly aways.
    2. Secure at the nape of the neck with a hair coloured bobble.
    3. spray shine spray and smooth onto hair.
    4. Spray with hairspray
    5. Wrap a piece of hair around the bobble to hide it and keep that super sleek look throughout.


    Curly up do
    This hairstyle is much about creativity, with most hair up's there is no rules and you can do what you want. So if you fail, take it out and do it again until it looks how you want it.

    what you will need:
    • Pins
    • Grips
    • Hairspray
    1. Curl your hair with the straighteners or whatever you find easiest.
    2. Scrunch your hair in your hands and squash flat onto your head,
    3. Grip into place- grips are better at this stage as you need to hold up the style, So your grips are your foundations, if you like.
    4. Make sure your main heavy places are secure e.g nape of neck and each side.
    5. twist small sections to make it more interesting,
    6. Use open pins to add twists and tame fly aways.
    7. Spray in place.


    so hopefully you should not look like this on a monday morning....

    if you have any further styles you'd like to see me demonstrate please ask as i would be happy to do so :)


    Thursday 26 March 2015

    Those all important EYEBROWS!


         That 'Perfect Brow' Shape.


    My next post is about... yep you guessed it, eyebrows. My obsession. The one thing I won't leave the house without (You know what I mean anyway!). Keep reading to find out how I 'tame my bushes' hahaaa!

    So the most important thing about eyebrows is a good basic shape. Endless amounts of makeup can't help badly shaped brows, if you're a 'sucker for a plucker' then leave them to grow for a few weeks (2 to 4 depending on how thin they are), over plucked brows are not attractive.Your arch should be starting just outside your pupil. Also, thicker brows generally tend to portray youth. So put the tweezers down... yes, you... step away!! For me I like to have them threaded, It's quick, bare-able on the pain scale and the effects are well worth it.  I get mine done every month at my local newsagents, sounds horrendous really but there is a lady in a back room who does them for £3! £3 girls!! I do feel dodgy when I walk in and ask the cashier 'if she's upstairs' like it's some kind of drug deal!! haha. I heard of her through some friends whose eyebrows I admired and asked where they had their's done. She's a lovely lady, I always tip her a pound or two as i feel bad for her doing them so well for such little money! underselling herself If you ask me. I'd gladly pay £5. So yeah! If you live in Sutton Coldfield or Birmingham, try her out! She's in the newsagent's opposite Aldi.

    I know a lot of people use eyebrow pencil to fill their brows but I just can't get the hang of it and end up looking like i have drawn lines on my face as if crossing off a word in a word-search! Which as you can imagine... is not a good look. If you can use an eyebrow pencil successfully, I take my hat off to you. I stick to my
    brown eyeshadow and a small angled brush to create this look. I use the MAC eyeshadow in shade 'expresso' & eco tools angled eyeliner brush.

    My top brow DO's & DON'T'S:

    1. never use black- please please do not fill your brows with black, unless you want sharpie brows. Even if your hair is very dark naturally, go for a dark brown, it's too harsh otherwise.
    2. Matte finish eyeshadows are best -you don't want to look sweaty.
    3. Go for a Khaki Colour- Because hair naturally has a khaki undertone to it, using a brow pencil that has a touch of khaki colour will look more natural.  For whatever reason, most companies have reddish tinted brow products. This colour just screams “Fake!” So say no to the red tones.
    4. Use a concealer - underneath your brows to give that 'finished' look.
    5. Trim your brows -  another way to get that square look at the start of your brows is to trim your hairs with nail scissors, all to the same legnth. This will make them appear thicker and make an easier canvas for you to work with.
    6. Eyebrow gel- If your brows are thick and curly, use a brow gel like this one to keep them in place all day.  GOSH BROW GEL

    Application: 
    Starting with my natural brow, I use a lash & brow comb to smooth out my hairs, I sometimes wake up with them in all different directions, quite funny, Jacob laughs at me. So now they're all standing to attention, I take my angled brush and apply eyeshadow to the bottom line, so all along the bottom of my natural brow shape. Then, along the top. So now you have your two lines to follow when you are filling in. Next, fill in the mid and ends of your brow with your brush with smooth strokes to spread the product evenly. Remember less is more so when you think you've put enough on, take a mirror into natural light and look at yourself at arms length, like someone else would. Finally, the 'front' if you like. So I HATE it when girls eyebrows look like tadpoles with a huge head and small tail. So for me I just simply follow the natural hairs making it slightly squarer as I get to the very top. Not too round, not too square.

    if you look closely at the bottom photo, no ones two brows are the same, my left brow is a lot thicker at the start that the right, so do your best to match them up by adding bits into the  g / a  / p / s .


    Wednesday 25 March 2015

    AMAZING MASCARAS TO TRY RIGHT NOW


    3 AMAZING MASCARAS TO TRY RIGHT NOW.

    so like any other beauty junkie i have about 10 open mascaras in my makeup bag at the moment. I have a little order that i stick to every day.
    if you're anything like me, i hate the feel of false lashes on my eyes, im a contact lense wearer and they seem to dry my eyes out. aswell as making my lids seem weighed down on a night out they have to be hands down the most annoying things. so,  i've listed my top 3 mascaras to recreate that false lash effect without having to wear them. yippiee!


    my all time  favourite  im pleased to say is from the seventeen range BY BOOTS. I get so excited when i buy a budget product that does the same as a branded one. priced at £6.49 its pretty affordable for all ages, especially if you have a voucher which boots are pretty good at.  it has special lash lifting properties with 24 hour curl and lift. the brush is  'anti clump' which really does work. it loads the brush with just enough to create your doll like lashes without getting blobs of mascara on a single lash. I like to use this first in my routine to achieve the lift and separation I can then build on. if you're planning on applying more than one coat, do not let your lashes completely dry as this can cause them to stay rigid and hard to manipulate.  MY ONE BAD POINT?  nope, im struggling.  5 stars*****
    used it ? let me know what you thought.

    my next favourite has to be Loreal's fALSE LASH telescopic mascara in magnetic black. this is abit more than your average mascara priced at £10.99 it's a bit of a gamble, but for me it was worth it, i've never looked back. It builds effortlessly, instantly lengthening your lashes. i recommend about 3-4 coats of this one to really get that 'wow' factor that false lashed give you.  if i had to pick one bad point about this mascara i would say the brush is slightly too long, the amount of times i have given my self a nice black dot on the inside of my nose! but then you can do that with any mascara. All in all a very good mascara 4 stars **** 
    USED IT ? LET ME KNOW WHAT YOU THOUGHT
    so those two mascaras, from Boots, you can get on 3 for 2 which they have on alot of the time, youve got to look after those pennies! :)

     third on my list is Loreal volume million in ultra black.  This is my mums favourite. She says its like magic in a bottle. it's quite a clever mascara as the brush has many bristles to really fan out your lashes and get them super spread out. on the top of the bottle there is an 'excess wiper' to remove any excess mascara, leaving it coated with just the right amount of product on the  brush. priced at £10.99 it's again a bit dearer than your average, but still affordable, or hey.. use some boOts advantage card points. 
    4 stars**** 
    USED IT ? LET ME KNOW WHAT YOU THOUGHT

    of course, lashes arent complete without a good curler and for me, it's no.7 's lift and curl lash curlers. they're  a steal at £8.00. perfect for a small birthday gift  or when you just fancy treating yourself  http://www.boots.com/en/No7-Lift-Curve-Eyelash-Curler_1273617/ good old boots. I have about 8 pairs of lash curlers including french connection and bobbi brown and these are by far my favourite.
    top lash curling tips
    1. curl when you have no makeup on, after moisturising.
    2. hold for 30 seconds.
    3. curl the base of your lashes, then the tips also.
    4. replace pads when they get worn.
    5. wash pads in between use to keep clean and mascara/bacteria free .
    hope you've enjoyed my post, may you all have great lashes xxx